Roof racks and load carriers
WARNING: When loading the roof rail crossbars, it is recommended to evenly distribute the load, as well as maintain a low center of gravity. Loaded vehicles, with higher centers of gravity, may handle differently than unloaded vehicles. Extra precautions, such as slower speeds and increased stopping distance, should be taken when driving a heavily loaded vehicle.
Note: The maximum recommended load is 100 pounds (45 kilograms), evenly distributed on the crossbars.
Note: Loads should never be placed directly on the roof panel. The roof panel is not designed to directly carry a load.
For proper function of the roof rack system, loads must be placed directly on crossbars affixed to the roof rack side rails. Your vehicle may be equipped with factory-installed crossbars. Ford Genuine Accessory crossbars, designed specifically for your vehicle, are also recommended for use with your roof rack system.
Make sure that the load is securely fastened. Check the tightness of the load before driving and at each fuel stop.
Adjusting the Crossbars (If Equipped)
Note: Wind noise can be minimized by either removing or repositioning the crossbars when they are not is use. Position the rear crossbar fully rearward and the front crossbar 10 inches (25 centimeters) from the front end-cap.
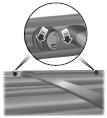
1. Loosen the tie-down hooks at both sides of the crossbar by turning them counterclockwise.
A small screwdriver or similar tool can be used to break the torque by inserting
the shaft into the tie-down hook and twisting.
2. Slide the crossbar to the desired position. This may require someone on each
side of the crossbar.
3. Tighten the tie-down hooks at both sides of the crossbar by turning them clockwise
until tight.A small screwdriver or similar tool can be used to tighten the hook
an additional half turn.
Make sure to check that the tie-down hooks are tight each time a load is added or removed from the roof rack, and periodically while traveling.
Make sure that the load is secure before traveling.
See also:
Roadside Assistance
Vehicles sold in the U.S. : Getting roadside assistance
To fully assist you should you have a vehicle concern, Ford Motor Company offers
a complimentary roadside assistance program. This program is ...
Clearing
Note: All programmed MyKeys can be cleared within the same key cycle in
which a MyKey was created, otherwise an admin key is required to clear the keys.
To clear all MyKeys (which removes all restr ...
Running out of fuel
If you have run out of fuel and need to refill the vehicle with a portable fuel
container, see Running out of fuel in the Maintenance and Specifications chapter
for proper fuel filling method usin ...