Auxiliary input jack
WARNING: Driving while distracted can result in loss of vehicle control, crash and injury. We strongly recommend that you use extreme caution when using any device that may take your focus off the road. Your primary responsibility is the safe operation of your vehicle. We recommend against the use of any hand-held device while driving and encourage the use of voice-operated systems when possible.
Make sure you are aware of all applicable local laws that may affect the use of electronic devices while driving.
WARNING: For safety reasons, do not connect or adjust the settings on your portable music player while your vehicle is moving.
WARNING: Store the portable music player in a secure location, such as the center console or the glove box, when your vehicle is moving. Hard objects may become projectiles in a crash or sudden stop, which may increase the risk of serious injury. The audio extension cable must be long enough to allow the portable music player to be safely stored while your vehicle is moving.
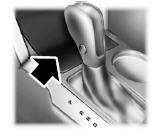
The auxiliary input jack allows you to connect and play music from your portable music player through your vehicle speakers. You can use any portable music player designed for use with headphones. Your audio extension cable must have male 1⁄8-inch (3.5 millimeter) connectors at each end.
1. Switch off the engine, radio and portable music player. Set the parking brake
and put the transmission in position P.
2. Plug the extension cable from the portable music player into the auxiliary input
jack.
3. Switch the radio on. Select either a tuned FM station or a CD.
4. Adjust the volume as desired.
5. Switch your portable music player on and adjust its volume to half its maximum
level.
6. Press AUX until LINE or LINE IN appears in the display. You should hear music
from your device even if it is low.
7. Adjust the volume on your portable music player until it reaches the volume level
of the FM station or CD. Do this by switching back and forth between the AUX and
FM or CD controls.
See also:
Brake fluid check
Fluid levels between the MIN and MAX lines are within the normal operating range;
there is no need to add fluid. If the fluid levels are outside of the normal operating
range, the performance of t ...
Trailer towing
Trailer towing with your vehicle may require the use of a trailer tow option
package.
Trailer towing puts additional loads on your vehicle’s engine, transmission,
axle, brakes, tires and suspen ...
Recreational towing
Vehicles Equipped with a 2.0L Engine
Note: Put your climate control system in recirculated air mode to prevent
exhaust fumes from entering your vehicle. See the Climate Control chapter.
Follow the ...